Accessibility
Converting to a PDF from Microsoft Word
Last modified 2/16/2022
Recent versions of Microsoft Office products have accessibility features built into the program to help you convert documents to PDFs. Before converting your PDF from Word determine how your PDF will be distributed. Will it be printed and physically and posted? Will it be emailed or uploaded to a website? Knowing these answers will help you determine the best way to convert your PDF.
Explore Your Options
Microsoft Word has multiple ways to convert a PDF. Each method can vary in results. Some tables and list may be tagged inaccurately or the converted PDF may not be tagged at all.
- Save As
- Export to PDF
- Print to PDF
Save As
The Save As function allows you to save your document in a PDF File format. If you have created an accessible Word document (i.e. formatted headings, tables, lists, images with alt text, etc.) then the resulting PDF should be tagged for accessibility.
Step 1. Select File.
Select File from the menu bar, then choose Save As to open the Save As menu.
Step 2. Choose the File's Location
From the Save As menu, select a folder. This will open the Save As dialog. Choose the location for where you want to save the new PDF.
Step 3. Change File Type to PDF
From the Save as Type dropdown, choose the PDF (*.pdf) option. Your original file name will remain the same but will have .pdf instead of .doc at the end.
Step 4. Save
Make sure your document has a meaningful title then select the Save button.
Export to PDF
The Export to PDF option allows you to covert to PDF using Adobe Acrobat Pro. This is likely an add-on to your Microsoft Word account. If you have created an accessible Word document (i.e. formatted headings, tables, lists, images with alt text,, etc.) then the resulting PDF should be tagged for accessibility.
Step 1. Select File.
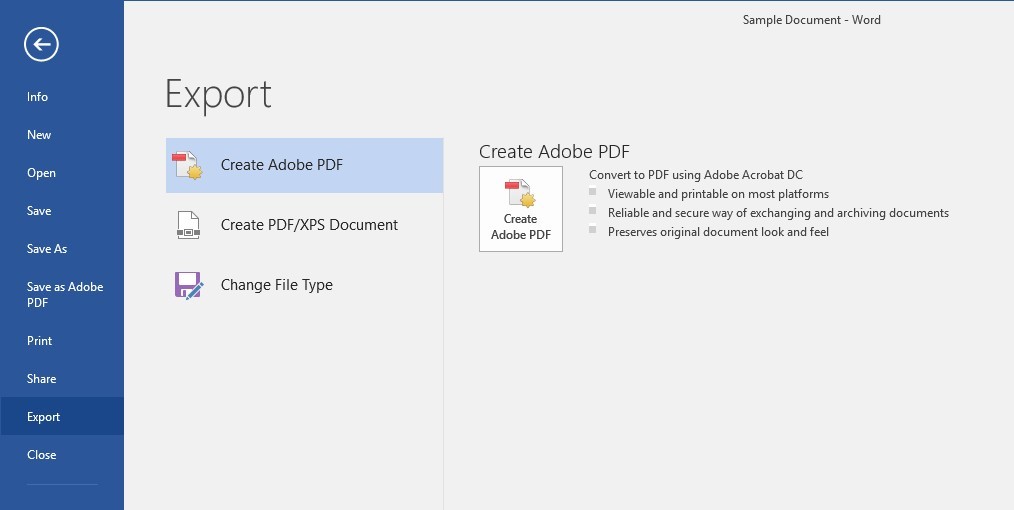
Select File from the menu bar, then choose Export to open the Export menu.
Step 2. Create Adobe Acrobat PDF.
In the Export menu, select the Create Adobe PDF button.
Step 3. Save Adobe File As.
In the Save Adobe File As dialog box, select the Options button.
Step 4. Enable Accessibility and Reflow with Tagged Adobe PDF.
In the Options dialog box, check the check box for "Enable Accessibility and Reflow with Tagged Adobe PDF." Choose OK.
Step 5. Name your file
Type the name of your document into the File Name field.
Step 6. Save
Make sure your document has a meaningful title then select the Save button.
Print to PDF
The Print to PDF function will convert your file to a readable PDF. Remember, a readable PDF has not been tagged for accessibility. Any formatting you have done in Word will not be transferred to the PDF. You will need to manually add document tags in Adobe Acrobat Pro to make your PDF accessible.
Feedback
To suggest an update to this article, ISU students, faculty, and staff should submit an Update Knowledge/Help Article request and all others should use the Get IT Help form.


