Technology
Print Class Rosters with Student Photos from the Faculty Center
Last modified 9/14/2023
The method outlined below allows you to print your class roster from the new Faculty Center.
Important!
You must do this in the Firefox web browser (on either PC or Mac). Other browsers no longer display the “This Frame" feature found in step 4 below.
Off Campus Authentication Note
If you are off campus, Campus Solutions will require an MFA request approval. Follow this link to set up your MFA if you still need to. MFA Info/Setup
- On your Windows PC or Mac, launch Firefox and log into Faculty Center.
- Click the Class Roster icon next to the desired course to open up the Class Roster.
- Move the cursor just to the right of the roster and right-click (Mac users with a one-button mouse can do this by holding down the Control key and clicking).
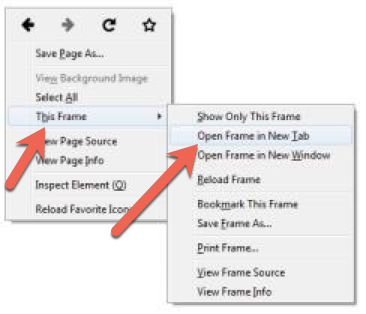
- On the pop-up menu that appears, hover the cursor over the This Frame option to reveal the submenu. On the submenu, select Open Frame in New Tab (Figure 1).
Figure 1: - Go to the new tab. You should see the same list, but without the extra content at the top of the page.
- Above the list, select the radio button labeled Include photos in list. This will display the photo for the first student on the list.
- In the blue navigation bar above the entry, click on View all. This will display the first 100 students enrolled in your course.
- Print the new page (Shortcut: CNTL-P)
- If you have more than 100 students in the class, use the arrow icon in the blue navigation bar to select the next group of students, and repeat steps 5 through 9.
How to Get Help
- Technical assistance is available through the Technology Support Center at (309) 438-4357, by email at SupportCenter@IllinoisState.edu, or by Live Chat at Help.IllinoisState.edu.
