Technology
Sharing Files in OneDrive
Last modified 9/18/2023
You can share your files and folders in your OneDrive library so that others can view and edit the documents.
Overview of Sharing Files
The documents and folders you store in your OneDrive library are private until you decide to share them. When you share documents and folders, you can decide whether to let people edit them or just view them. Files can be shared to users within Illinois State University, or they can be shared to external users who are outside of Illinois State University.
When sharing files with others, you have two options: you can invite people to view or edit the document via email, or you can create a direct link to the document and share the link yourself. The people with whom you share your files are not required to have a Microsoft 365 account, but if they would like to edit them or collaborate, they will need a Microsoft 365 license to do so.
Inviting People to View/Edit File via Email
In OneDrive, you can share access to files and folders by sending a link via email. The link in the email will give the individual direct access to the file or folder. When you choose to share your files you can grant View Only or Edit access.
Sharing a File or Folder
To share a file or folder, do the following:
- Go to office365.illinoisstate.edu.
- Log in to Microsoft 365 with your Illinois State email address and password.
- Click OneDrive .
- Move your mouse over the file or folder you want to share.
- Click the check mark to the left of the file or folder you want to share. You can only share one file or folder at a time.
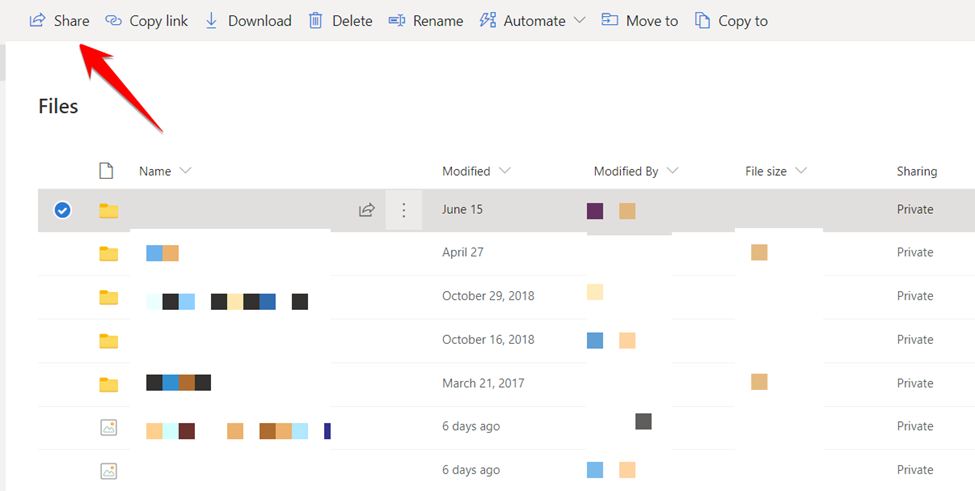
- Click Share (Figure 1).
Figure 1: - A small window will appear where you can specify the recipient of the shared file. By default, you will see the People in IL State University with the link can edit option. From here, you can simply enter an ISU email address, or multiple, to share the file with and click Send. If you want to share the file with specific people who are outside of the ISU domain, change the selection by clicking Specific People. This will allow you to share a file to an external user who does not belong in the ISU domain.
- If you chose Specific People, enter the email address or the last name of the individual with whom you want to share the file in the field provided. If the recipient has a Microsoft 365 account, the name will populate as you type. Otherwise, you will have to manually enter the person's email address. When you type the email address or name, select the name or the email address from the drop down menu that will appear. You can continue to add more individuals here or just choose one person. If you do choose to send to multiple people, you will see the option to Add another below the name of the first individual you chose.
- When you have finished selecting the audience with which you would like to share the file or document, click Send.
- You should see a notification stating that the file has been sent. The individual(s) previously selected will receive an email which will grant access to the file or folder. You will also receive a copy of this email.
Direct Link for the File/Folder
In OneDrive, you can also share access to files and folders by creating a direct link to the file or folder. You can share this direct link via email, on your personal website, or in other places. Anyone who has access to the link will have access to the document. You can create a link that will grant View Only or Edit access.
To create a direct link for sharing, do the following:
- Go to office365.illinoisstate.edu.
- Log in to Microsoft 365 with your Illinois State email address and password.
- Click OneDrive .
- Move your mouse over the file or folder you want to share.
- Click the check mark to the left of the file or folder you want to share. You can only share one file or folder at a time.
- Click Copy link.
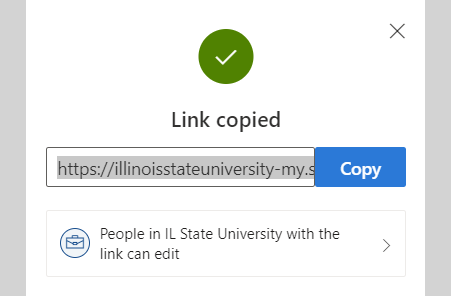
- The link will automatically be copied to your clipboard. You are also able to copy the link as it is provided to you in the pop-up pane. You can specify if the recipient(s) can edit the shared document or not (Figure 2).
Figure 2:
Anyone who clicks the link will have access to the file or folder with the permissions you selected.
How to Get Help
- Technical assistance is available through the Technology Support Center at (309) 438-4357, by email at SupportCenter@IllinoisState.edu, or by Live Chat at Help.IllinoisState.edu.


