Technology
Adding Events to Your Microsoft 365 Calendar
Last modified 9/19/2023
This article reviews how to create an event, such as an appointment or meeting, in the Illinois State University Microsoft 365 Calendar app. Also discussed will be how to add people (attendees) to the event, how to edit your event, and how to cancel your event.
Microsoft 365 Email/Calendar
Illinois State University’s Microsoft 365 Email and Calendar can be accessed through the Microsoft 365 online Mail and Calendar apps, via an email client (such as Microsoft Outlook or Mozilla Thunderbird), as well on mobile devices. This article focuses on the use of the online Calendar app.
The Microsoft 365 Calendar app lets you create and track appointments and meetings. You can add events to your Microsoft 365 Calendar, such as a personal appointment, birthday, or meeting, and you can also invite others to the event.
Important!
If you add a personal appointment, and you do not wish for anyone you share your calendar with to see that appointment, be sure to mark it as “Private” by checking the box next to “Private.”
To Add an Event to Your Microsoft 365 Calendar
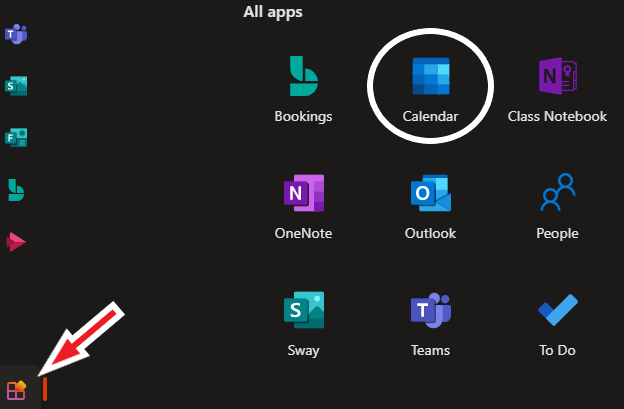
- Go to Office365.IllinoisState.edu, And log in with your full ISU email address and password. After logging in, click the All Apps button on the bottom-left corner of the screen. Next, click Calendar. (See figure 1)
Figure 1:- For more information, refer to Launching Apps in Microsoft 365
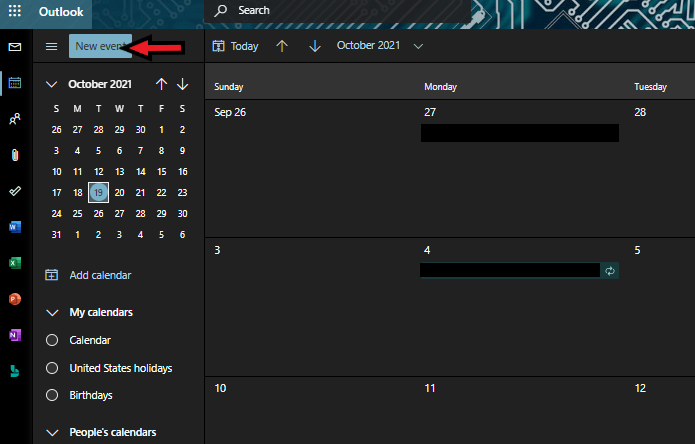
- Click New Event at the top left above your calendar, or double-click the Calendar to open a new calendar item. (See Figure 2)
Figure 2: - After clicking New Event, The Details page will open.
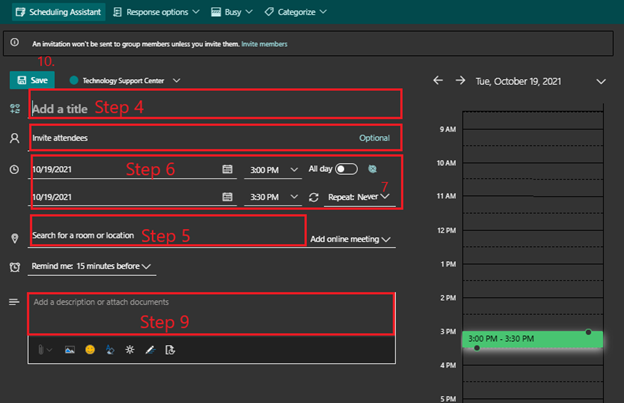
- In the first field, add a title for the event. The title of the event is what you see on your calendar.
- If you need to add a physical location to for the event, you may do so in the field labeled Search for a room or location. If not, you may skip this step.
- You may type a location directly into the field, or you may select a room from the options that appear after you have clicked in the field. If the location you want is not on the list, you may select Add room at the bottom of the list, which will allow you to select the building you want in order to view a list of rooms available in the building.
- Click on the date and time buttons on the third field to select the start date and time, as well as the end date and time for the event.
- You may switch on the “All Day” toggle button to indicate that the event lasts all day. This disables the start time and end time menus.
- If you want to create a recurring event, click the Repeat button to select the appropriate option from the drop-down menu. Then choose a date range in the From and To fields during which the recurring event will appear on your calendar.
- For example, if you have an event that recurs every day at 3:00 pm, you could select “Every day” and specify a To: date of None. This would result in the same event appearing on your calendar every day at that time.
- The “Remind me” option allows you to specify when Microsoft 365 should notify you that you have an upcoming event.
- For example, if you select 15 minutes, then Microsoft 365 will notify you 15 minutes prior to the start of the event. This notification will appear as a pop-up if you are logged into Microsoft 365 at the appropriate time. If you have added the Microsoft 365 calendar to your phone, the notification will appear on your phone as well.
- Use the text box at the bottom of the Details page to enter additional information about the event.
- Click Save and the event will be added to your Microsoft 365 Calendar. (See Figure 3 for a visual summary of the above steps)
Figure 3:
Adding People to an Event
Student Note
If you are inviting an instructor and/or professor to a meeting, remember to review their advertised office hours and be courteous of their time.
To add an attendee to a meeting:
- Create an event, as described above.
- Enter the names of the attendees in either the “Invite required attendees” field or the “Invite optional attendees” field.
Your attendees are now added to the event. After you complete the event and send it, your attendees will receive an email, which includes buttons they can use to accept or decline your invitation.
Edit an Event
You may edit an event after you have created it.
To edit an event you have previously created:
- Login to Office365.IllinoisState.edu.
- Click All Apps in the bottom-left corner. W
- Click Calendar.
- Click on the event and select Edit from the pop-up window that appears with the event details.
- Make any changes you wish to make to the event.
- Click Save .
Event attendees, as well as yourself, will receive an email with the updated event invitation.
Cancel an Event
You may cancel an event after you have created it.
To cancel an event you have previously created:
- Login to Office365.IllinoisState.edu.
- Click All Apps in the bottom-left corner. W
- Click Calendar.
- Click on the event and select Delete from the pop-up window that appears with the event details.
Event attendees, as well as yourself, will receive an email notification of the event cancellation.
How to Get Help
- Technical assistance is available through the Technology Support Center at (309) 438-4357, by email at SupportCenter@IllinoisState.edu, or by Live Chat at Help.IllinoisState.edu.


